The end of the previous generation of console games and the start of the current one has been heralded by loads of remakes of games less than a decade or so old, the so-called HD re-edits. Nevertheless, there is an economic alternative to such silliness (at least in most cases): the now-ancient PlayStation 2 continues to this day to be a source of titles to revisit, and an emulator like the program PCSX2 can give a layer of allure that lets you go back and enjoy them, complete with perked-up graphics. Here is a short tutorial to configure it.
BIOS and gamepad setup
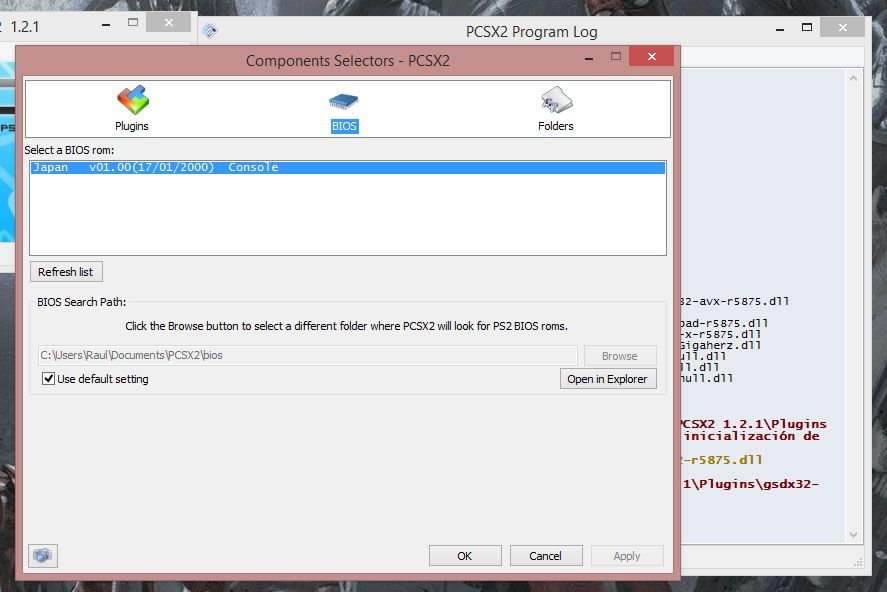
Once you’ve installed the emulator you’ll get a wizard that lets you select the default plugins and the language for the interface. Leave the plugins as they are and click Next till you get to the section for BIOS setup. From there you can open the folder where you want to store the different BIOS of the games you want to add using the button for that purpose. Here we encounter our first dilemma questioning the legality of emulation.

Just to be clear, using emulators is totally legal, and for games that require a BIOS for the console to work, you can download them from the Internet in good conscience if you have a PlayStation 2. Google is your friend for these things, but if you want to take the plunge properly, you can extract them yourself from the console, which to be completely honest is not worth the hassle at this point.
The next preliminary step before getting down to the nitty-gritty with the graphic setup is the control system. While you could always opt for a keyboard, mapping each element, a gamepad will give you an experience nearer the original, and the most advisable thing to save yourself problems is to turn to a USB gamepad for Xbox 360: good, good-looking, cheap, and autodetected by Windows. The screenshot below shows the completed setup.

A final preliminary consideration: although the emulator can run both physical games on CD and DVD or ISO images, it’s advisable to use the latter to get the best reading speed. If you want to create the image yourself based on your game catalog you can use any recording tool such as ImgBurn. Even still, we’ve tried with both systems and the difference in performance is negligible.
Setting up the graphics
First of all, go to Settings > Video > Plugin settings, the nerve center for setting up the graphics. You have to keep in mind that emulating PS2 is rather more demanding than other consoles, and it’s also true that it will run much better on Intel than AMD processors, although that doesn’t mean that the latter can’t do a more than acceptable job. In this case we’ve used two computers, a pimped-out desktop with a high-range i5, 8GB of RAM, and ATI R9 28oX, and then a Sony Vaio laptop with i3. The desktop emulated with all the parameters at their max with a decent frame rate. The second had no problems with the native resolution and allows texture filtering and light scaling without many problems.
Here is a summary of the options to keep in mind. The ones not mentioned are better to leave alone for the impact they have on performance, although there are no fixed guidelines and you have to tick and untick options till you find the ideal equilibrium between performance and graphic quality. Also you should note that each game is a world unto itself, and depending on how heavy it is on the graphics or internal optimization within the emulator, the results will vary enormously, particularly if the graphics are in 3D.

- Adapter: Leave this one as it is, as it selects the graphic adapter that you’re using by default.
- Renderer: Here you should select the default rendering system. In our case Direct3D gives better results than OpenGL. If you have a super tricked-out computer you can choose D3D11.
- Interlacing: This section lets you configure the interlacing mode for the image, that is, the system for drawing horizontal lines on the screen. At the beginning you can just leave it on Auto, but if you notice saw teeth with the image in motion (not those produced by the edges of polygons), you can try the option Bob ttf.
- Original PS2 Resolution: Here we’re going to assign the rendering resolution for 3D games. To avoid problems the best thing to do is use multiples of the original resolution, which you can access by clicking on the Custom field and select the best option from the drop-down menu. From 4x up it produces an awkward ghosting effect on the image. 3x is more than enough, as it equates to 1920×960.
- Enable FXAA: Ticking this option activates the antialiasing, which enormously improves the softening of the images by sketching them from a distance.
- Enable FX Shader: Activates the library of shaders that enormously improves the appearance of 3D figures.
- Texture Filtering: Activates the texture filter that adds a welcome blur effect at high resolutions with superimposed flat images.
- Anisotropic Filtering: Anisotropic filtering improves the textures of drawings at different angles. Like in the previous section, it greatly improves the quality of the 3D models. With 2X you should be more than good.
- Enable Anti-aliasing: It’s advisable to activate the anti-aliasing above all for resolutions lower than 720p, as if you don’t you’ll see artifacts in the image views, particularly the far-away ones when it attempts to interlace the image.
The last step is in Settings > Video > Window settings, where you’ll define the emulator’s output resolution. In the ratio section you can choose between 4:3 and 16:9 and adapt the size of the window. Depending on which game you’re running, you’ll manually select one of the presets, although most of the PS2 catalog runs on 4:3.
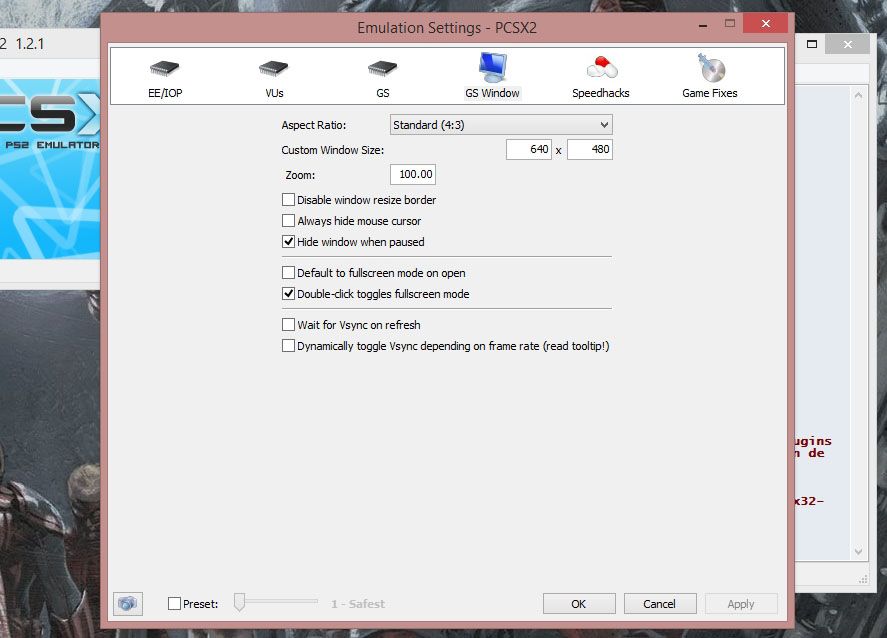
In the custom window size you’ll select the output resolution; if you’re using 4:3 you’ll take the height of your monitor as a reference to try to find a native resolution. For example, if you want to use a 1080p resolution you’ll take the denominator of 1920×1080 and find the ratio by dividing by three of the same. In other words, (4*1080)/3 = 1440, or put another way, a window size of 1440×1080, which will be maintained even if you put the emulator in full screen mode. In any case, when you use Full Screen the screen will adapt proportionally to the window size in question. If you’ve correctly configured the Direct3D output resolution in the previous step everything should run smoothly.
In terms of vertical synchronization, you usually can’t see the crop marks in most games, meaning it’s not really needed to activate the option that’s already covered by the performance.
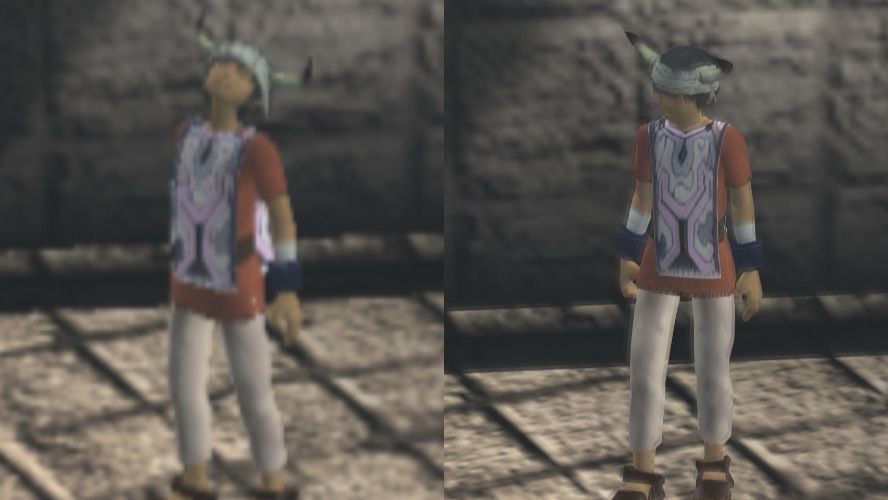
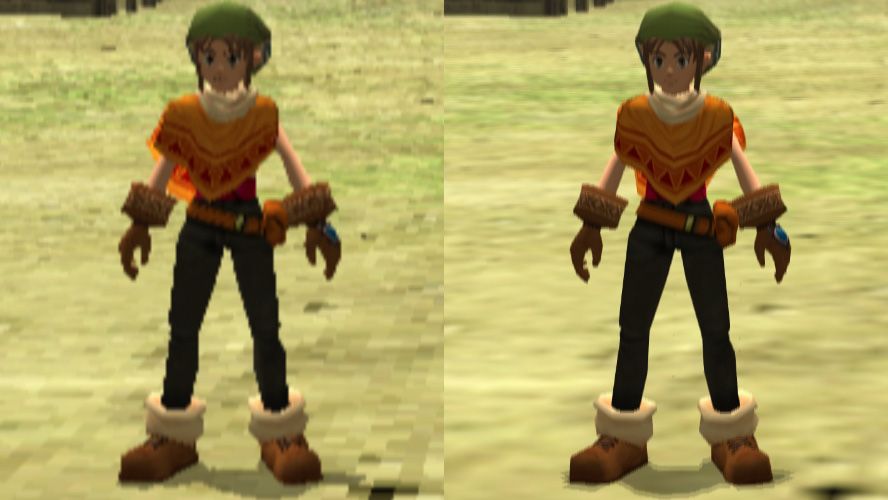
And now, finally, an example: to test the changes we’ve used the games Yakuza, ICO, and Dark Cloud. The differences are obvious. You can check out the images in a larger size HERE and HERE.

A step further
All this is the BASIC stuff you need to know to be able to set up your own economic HD version. Experience has shown that many of those reedits on the market do not actually include better graphics beyond the change in resolution, and thus for example the textures are exactly the same, with a good enough level of detail to look good on a higher resolution.
On PCSX2 it’s not possible, but other emulators like Dolphin let you insert graphic packs into Wii and Gamecube games where users have replaced the original textures with completely new ones adapted to higher resolutions, often to even better result than those you’ll find in commercial remakes and revisions. Emulation is not an impediment to the industry, but a poke to help them get on the ball.


Rewarded As best facebook Liker Get More Than 1000 Likes (Y) Using This Awsome site => Www .NextLiker .COM
I like it
Pp
ps2 n ps3 all time best
Cp
Pp
Ghatya game tumhari tarah ghatya admi
♥♥♥
I m having PCSX2
Ps4 da best
i want to ask . where the CD games PS2 selling ? i cant find it
pls. Give me Anyone ps3 emulator
Aray Koe Bhee
http://jobrize.com/index.php?ref=9483
:-)
Nice janb
Nice
I wanna play God of War 3 in my pc. guyz anyone have PS 3 emulator.������
U torrent is the best way to fownload agame if someone know how to use u torrent
I go crazy on ps games.
https://www.fiverr.com/s2/4aeb1628b4
Bryan ;) ‘lam na
Naci
i have ps2 ,3,n4
REALLY?
Suban kuch ache pic laga do
Because emulators sometimes uses our graphic cards..
..a.d.m
Ihave it
Wats up guyz
dreamcast emu :)
no time to check..just go to comments
Nice
emuparadise.me
I need a ps2 i hv a ps3 bat i like a ps2
please like this page!! thanks!
https://www.facebook.com/pages/Mildred-Fajardo/807607556019643
jus like 7 sins
Yakuza is the best game ever
ps 2 bekar h….!
man i wanna play FF XII and Persona 3 fes again i hope this one works :D
What about in PS1?
If you stop reading this you are gonna die, My name is Teresa Fidalgo if you don't post this on 20 photos I will sleep with you forever. This girl ignored and 29 days later her mom died. I am real you can search me up on google
I don’t like ps2 Bec I have Xbox 360 kinect special
(Y) I’m BAcK :D
Do you like PSP, PS4, 360, ONE, PC and wanna play all its games?
Ha main
I want to play games of controller(DMC 4. Final Fantasy) in pc useing mouse
You have emulator of ps2 in android?
Hn nic game broo
Witam. Może ktokolwiek wejśc na stronę i napisać tu czy jest dobra czy nie?
http://fotografiaart.piszecomysle.pl/ – link
me he comprado unas zapatillas para padel muy chulas y baratas en este lugar http://www.myamazon.es/deportes.html
[…] Also on Uptodown | How to set up PlayStation 2 emulator PCSX2 […]
[…] Here’s a great guide that lays out the basics of configuring PCSX2 and its graphics settings without overloading you with information. It also touches on the one complicated part of setting up the emulator: the PS2 BIOS. While the PCSX2 code is completely legal, Sony owns the code of the PS2 BIOS. That hasn’t stopped the BIOS files from being widely distributed online, but it does mean the only free-and-clear legal way to obtain the necessary BIOS files is to dump them from your own PS2. PCSX2 offers a forum and guide for how to dump your BIOS. […]
[…] Here’s a great guide that lays out the basics of configuring PCSX2 and its graphics settings without overloading you with information. It also touches on the one complicated part of setting up the emulator: the PS2 BIOS. While the PCSX2 code is completely legal, Sony owns the code of the PS2 BIOS. That hasn’t stopped the BIOS files from being widely distributed online, but it does mean the only free-and-clear legal way to obtain the necessary BIOS files is to dump them from your own PS2. PCSX2 offers a forum and guide for how to dump your BIOS. […]
[…] Here’s a great guide that lays out the basics of configuring PCSX2 and its graphics settings without overloading you with information. It also touches on the one complicated part of setting up the emulator: the PS2 BIOS. While the PCSX2 code is completely legal, Sony owns the code of the PS2 BIOS. That hasn’t stopped the BIOS files from being widely distributed online, but it does mean the only free-and-clear legal way to obtain the necessary BIOS files is to dump them from your own PS2. PCSX2 offers a forum and guide for how to dump your BIOS. […]
[…] Here’s a great guide that lays out the fundamentals of configuring PCSX2 and its graphics settings with out overloading you with info. It also touches on the a single difficult element of setting up the emulator: the PS2 BIOS. Even though the PCSX2 code is completely legal, Sony owns the code of the PS2 BIOS. That hasn’t stopped the BIOS files from getting broadly distributed online, but it does imply the only totally free-and-clear legal way to get the needed BIOS files is to dump them from your personal PS2. PCSX2 delivers a forum and guide for how to dump your BIOS. […]
[…] Here’s a great guide that lays out the basics of configuring PCSX2 and its graphics settings without overloading you with information. It also touches on the one complicated part of setting up the emulator: the PS2 BIOS. While the PCSX2 code is completely legal, Sony owns the code of the PS2 BIOS. That hasn’t stopped the BIOS files from being widely distributed online, but it does mean the only free-and-clear legal way to obtain the necessary BIOS files is to dump them from your own PS2. PCSX2 offers a forum and guide for how to dump your BIOS. […]
Excellsnt goods from you, man. I have take into account your stfuff previous to and you’re just too wonderful.
I actually like whaat you have bought here,
really like what you are saying and the best way in which you say it.
You aare making it enjoyable and you continue to care for to stay it
sensible. I can’t wait to read far more from you. Thatt is really a tremendous web site.
Great site you have here but I was wondering if you knew of any discussion boards that cover the
same topics discussed here? I’d really like to be a part of group where I can get suggestions from other knowledgeable individuals
that share the same interest. If you have any suggestions, please let me know.
Bless you!
playing best free pake free flash games at pakegames.net
Have you ever considered about adding a little bit
more than just your articles? I mean, what you say is important and
all. However think of if you added some great images
or videos to give your posts more, “pop”! Your content is
excellent but with pics and clips, this site could certainly be one of the greatest in its niche.
Good blog!
[…] Tutorial to set up PCSX2, the best emulator for PS2 – PCSX2 is a powerful PlayStation2 emulator which allows you play great PS2 games on your computer. […]
It’s actually a great and helpful piece of information. I am glad that you shared this
helpful information with us. Please stay us up to date
like this. Thanks for sharing.
After exploring a few of the blog articles on your website, I truly appreciate your way of writing a
blog. I added it to my bookmark site list and will
be checking back soon. Please check out my website too and let me know
your opinion.
If some one needs expert view on the topic of blogging then i
recommend him/her to visit this website, Keep up the pleasant job.
Admiring the time and effort you put into your website and
in depth information you offer. It’s nice to come across a blog
every once in a while that isn’t the same out of date rehashed information. Great read!
I’ve saved your site and I’m adding your RSS feeds to my Google account.
I’m just commenting to make you understand what a helpful encounter my child developed browsing your blog. She came to find several pieces, not to mention how it is like to have a marvelous teaching character to have other folks easily learn a variety of tortuous things. You undoubtedly did more than people’s expected results. Thank you for displaying these effective, trusted, revealing and also cool thoughts on the topic to Julie.
Quality articles is the main to interest the viewers to pay
a visit the website, that’s what this web site is providing.
none of this looks like what i have now..
i have pcsx2 v 1.4. i have set res at 1920*1080p in video plugin but games are keep running at 512*448 res
i have tried everything nothing helps
if you guys have any solution please let mer know
[…] Aquí hay una gran guía que establece los conceptos básicos. de configurar PCSX2 y sus ajustes gráficos sin sobrecargarte de información. También toca la parte complicada de configurar el emulador: el BIOS de PS2. Si bien el código PCSX2 es completamente legal, Sony posee el código de la BIOS de PS2. Eso no ha impedido que los archivos de BIOS se distribuyan ampliamente en línea, pero sí significa que la única forma legal libre y clara de obtener los archivos de BIOS necesarios es volcarlos desde su propia PS2. PCSX2 ofrece un foro y una guía sobre cómo volcar su BIOS. […]