At this point it’s quite common for people to have a computer with no disc reader, so the only way to install an operating system is by using a USB drive to launch the install process. In this short guide we’re going to show you how to install Windows 8 from a USB drive file created from a DVD or ISO image.
Microsoft offers online installation of Windows 8 if you already have some version of the operating system installed on your computer. In fact, the company markets digital update packages for Windows 8. Nevertheless, in many cases you’ll need to launch the Windows package from an external unit, whether because you don’t have another operating system installed, or because there’s some sort of problem and you can’t start the OS you already have, leaving this as the only option for accessing system recovery tools in certain situations.
1. Create an ISO image from a disc
If you have a retail copy of the program on a DVD, you’ll have to convert its contents to an image file to then pass to your USB drive. (If you already have the file in image format, you can go right to step 2.)
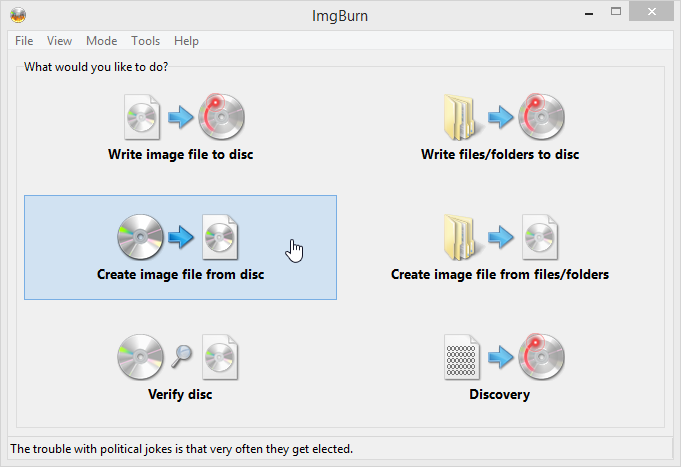
To do the conversion you’ll need a program capable of converting discs to this format, with a good, simple, free alternative being ImgBurn. Once you’ve installed the app and introduced the disc, you need to click “Create image file from disk”. By default it will take you to the Documents folder.
2. Save the image to your flash drive
For this step you’ll need the Windows 7 USB DVD Download Tool, created by Microsoft expressly for the task we’re discussing here, although it’s also completely functional for the latest versions of the operating system, including Windows 8.1. Once installed, the process consists of four simple steps:
- Select the ISO file: You need to select the image file that you created previously and that you have on your hard drive.
- Select the type of data support: You’ll be offered the option to install the image on a DVD or a flash drive. Obviously you’re going to select the second option.
- Insert the USB drive: You need to connect your USB to the computer, with the only requirement being that the drive has at least 4GB of free space. Keep in mind that all the contents of the drive that you use will be fully deleted after the fact.
- Create the USB launch file: A progress bar will tell you the time left to do the conversion.

3. Start up the OS from the USB
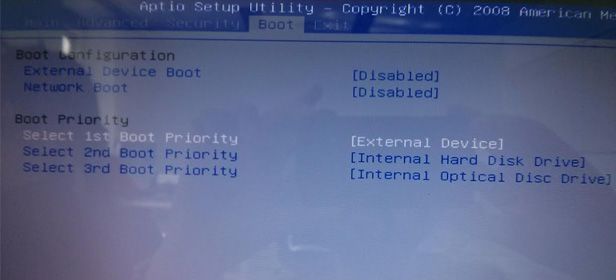
Now that you have your file created, you’ll now need to start your computer from your USB. If you already have an operating system installed, you’ll need to change the order of startup. To do so, you’ll have to access the BIOS on your system by clicking F2 (delete or F12 on certain computers) to enter the configuration menu.
Depending on the manufacturer of your chipset, the BIOS menu should have a different distribution, although in most cases the configuration will be in the BOOT section. You’ll have to set the USB drive as your first option for startup. This means that before checking if there is an OS installed, your computer will search the connected drive. Depending on your computer, the option to be ticked will be either USB or External Device.
After this, you’ll just need to restart your computer with the connected flash drive and follow the installation instructions from Windows just as if you were installing from a DVD.
Note: When you select the ISO from Windows 7 DVD USB Download Tool you might receive a pop-up warning telling you the image is not valid. If this happens, if you’ve copied the image from a DVD you should try again with another program besides ImgBurn such as ISO Workshop or All Free ISO Creator. If all else fails, you can finally try with another USB conversion programs such as Rufus.


